Monday 8 August 2022

'Be Curious' - created for DT 2Craftychipbaord

Hello there!
Emma with you today, and I share a page that has a hint of 'spring' about it.


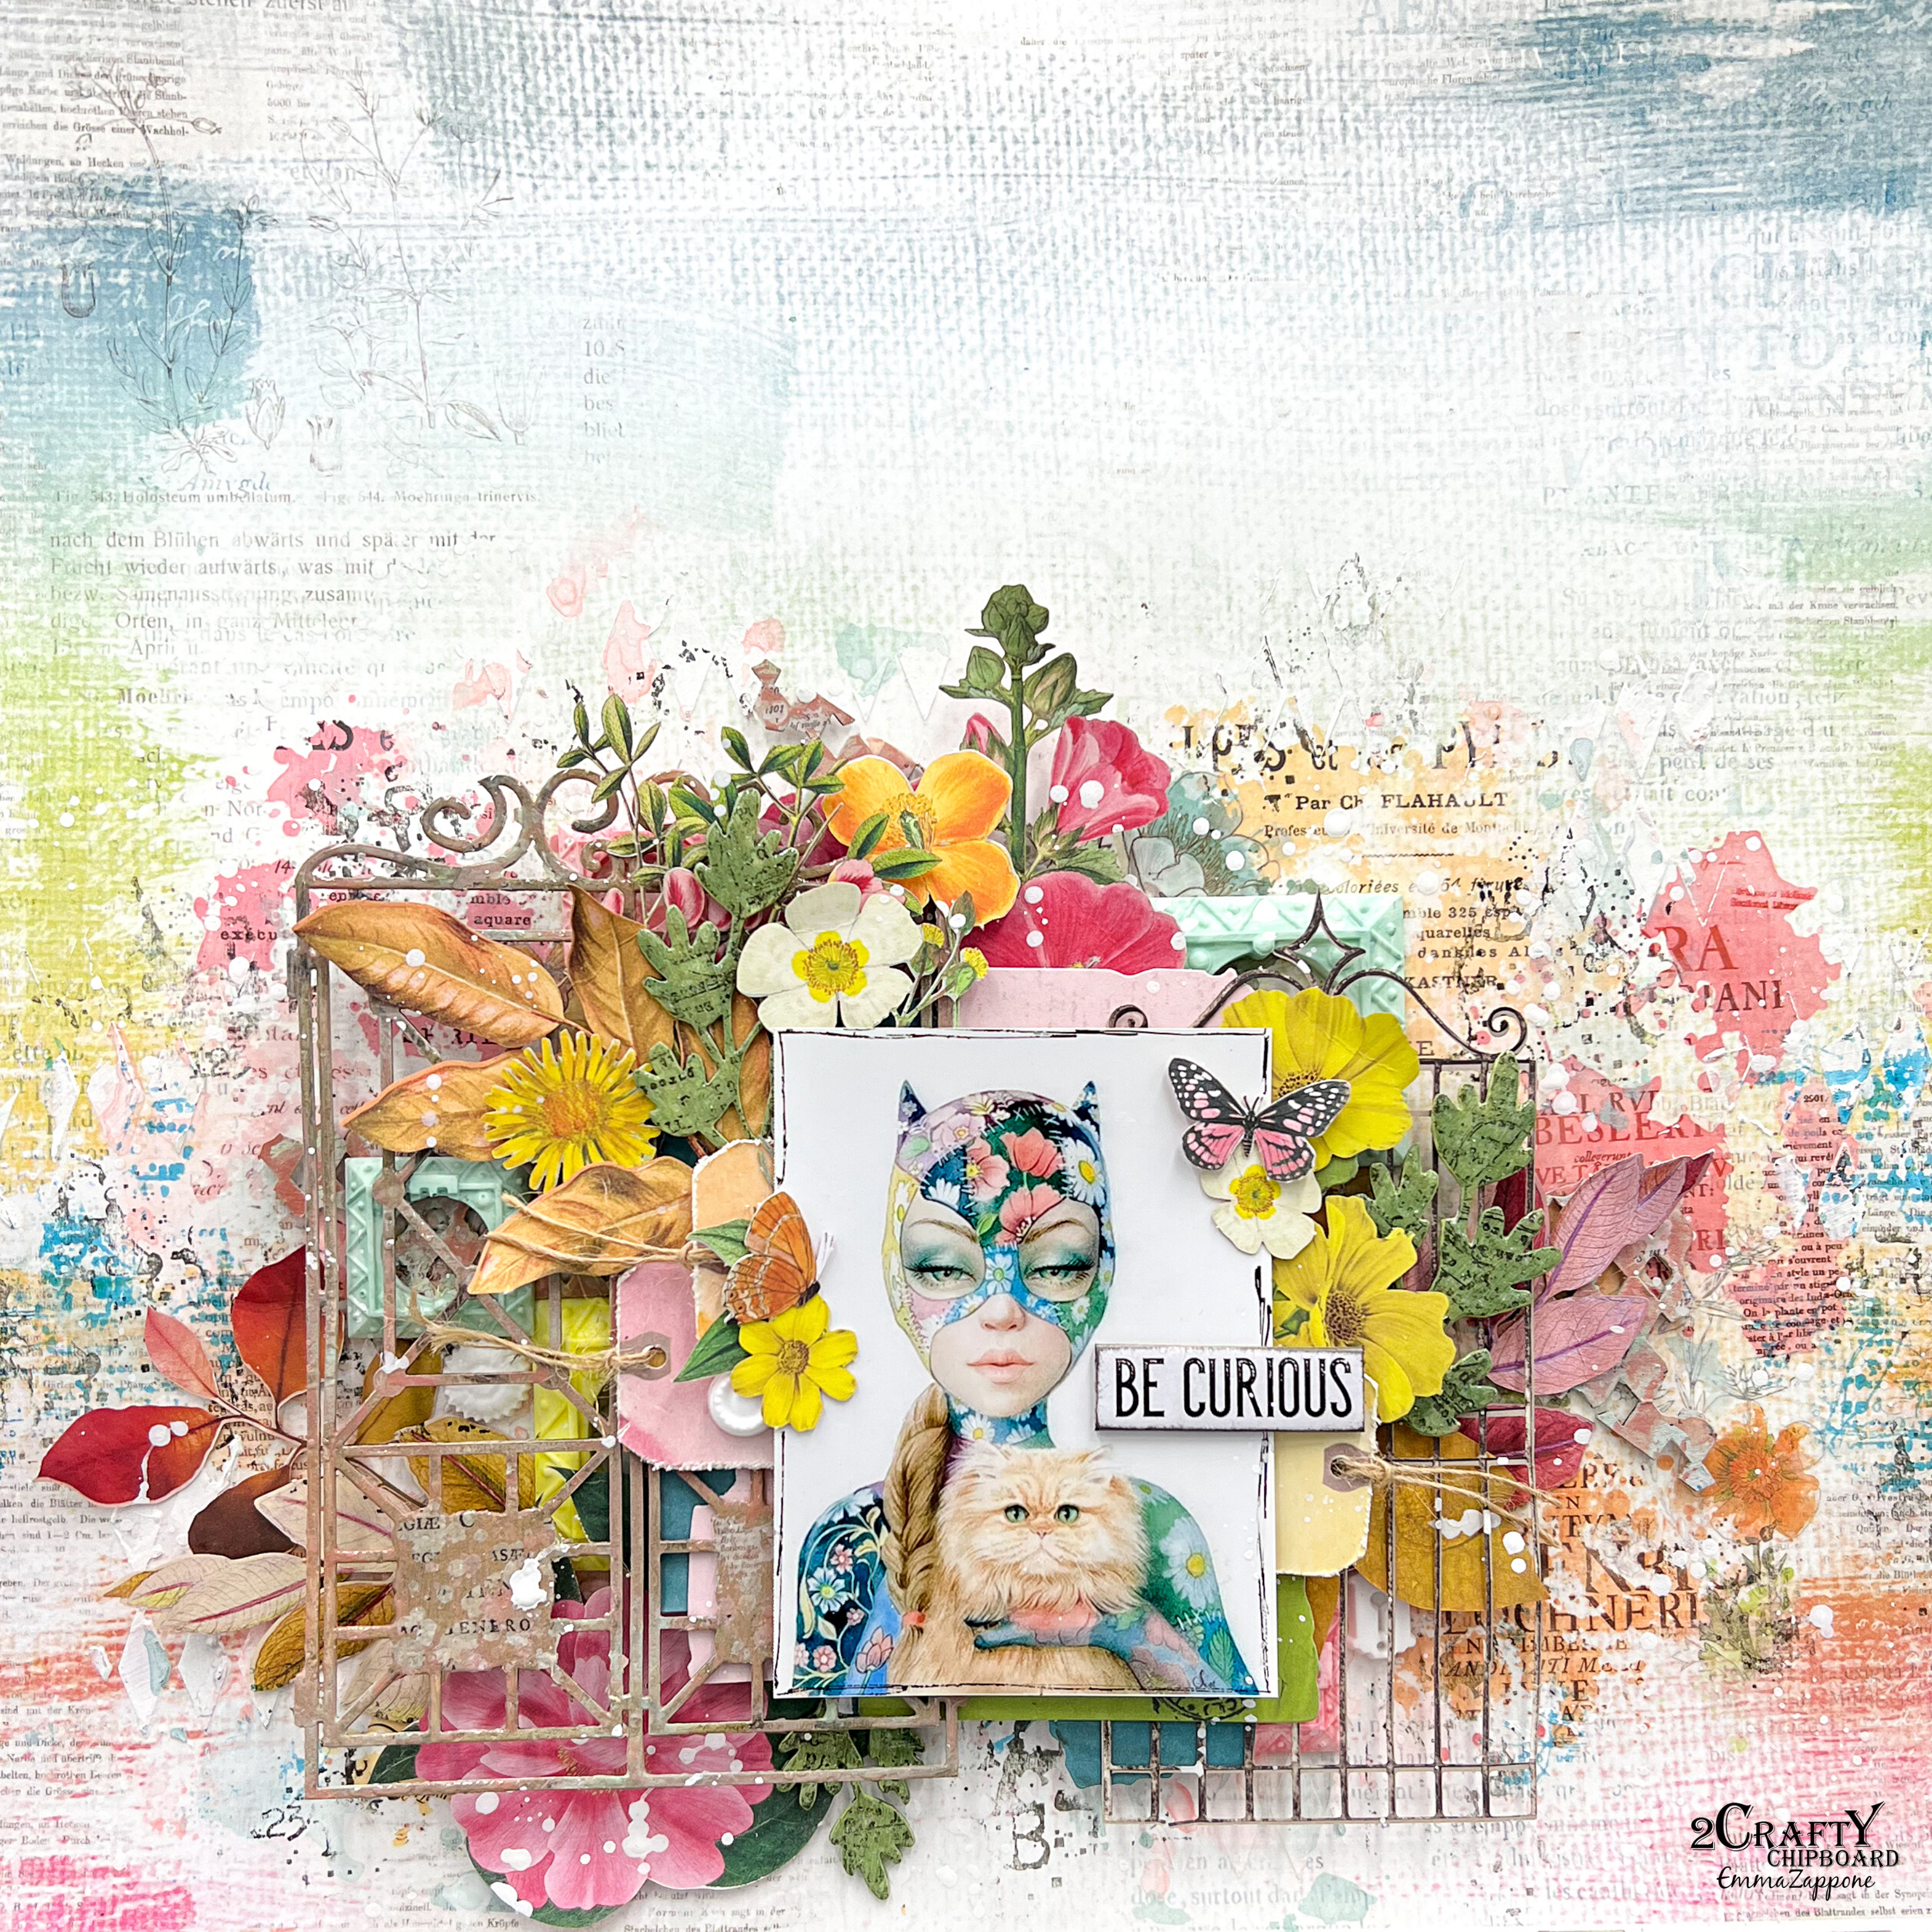
This page has a lot going on, well it has for me as I usually layer but not too heavy. But with this one I really wanted it to sing floral and yet capture the idea of a 'curious' garden behind the gates.
Plus the choice of chipboard I chose was so much fun to play with......
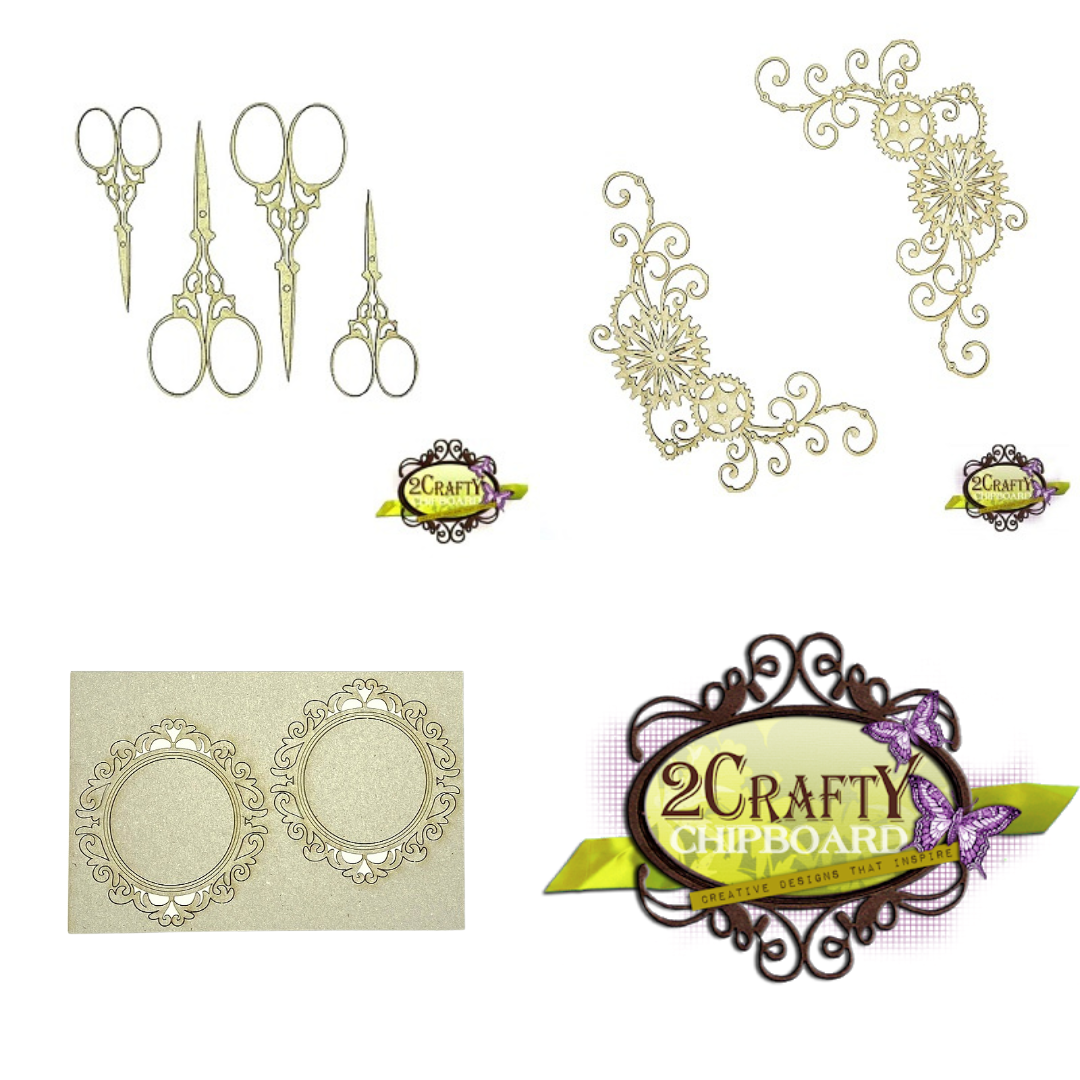
Diamond Chunks
Ornate Gateway
Foliage set 10


I spent quite some time altering the chipboard pieces with different mediums for this page.


The stunning Ornate Gateway started with a layer of White Gesso, then I added 2 liquid acrylic colours in umber and nude. Once these were dried I added some rub-ons in a few spots to mimic the look of old 'signs' on old botanical garden gates.


I did a similar finish on the Diamond chunks, but without the umber tone to create a contrast from the other elements. I used these pieces as a very subtle layer amongst my elements.


The Foliage were also primed with white Gesso. Then 2 green acrylic paints were added to create a 2 tone effect. Then stamping was added, again to create more visual interest. Finally on the Foliage and the Ornate Gateway I added a clear emboss powder to really make them special.


Along with a mix of resin pieces and amazing paper elements this page really 'sprung' off the page. I have added dimension by lifting off the page, so it gives the feel that you want to peer through the gate, to see more wonder. 'Be Curious' so to speak.


Thank you so much for joining me today.

I look forward to seeing you again later this month.

Stay Crafty!

Em xx


Saturday 30 July 2022

'Maggie Mae' created for DT 2Crafty Chipboard

Hi everyone, Emma with you all today.
I haven't shared for a little while so I am excited to get back creating and sharing with you again.
So for today's share I created something a little grungy with plenty of awesome chipboard that is all featured on an A4 layout.


 Here is the chipboard used.....

Corner Steampunk Set 6 
Industrial Light Bulbs
Steampunk Gears small


I have cut and layered the chipboard for this project to suit the layers under my image.
This helps extend the chipboard and saves wasting anything that you can not see.


The chipboard has all been primed with black Gesso and then a variety of waxes used to create depth and interest on each piece. The Steampunk corner piece has been left dark so the other pieces can be a nice contrast when placed on top.


I also like to only adhere a section of my chipboard so that there is movement within the page. For example the Light Bulb ends are not glued so they raise naturally off the page, again this helps with visual dimension and stops that 'flat' look.


I do love how the small steampunk gears look layered over the corner and bulbs, especially with that copper wax to make them pop.

I hope this page has inspired you to get a little grungy and have fun creating something different.

Catch you all again soon, Em xx


Thursday 23 June 2022

Colour Outside the Lines - created for ScrappingClearly

 Hi, Emma with you all this lovely Thursday.

The project that I'm sharing with you today is inspired by this months mood/sketch.
It is such a great sketch and features absolutely fab colours. 


Here is the inspo....


The products I chose to use also helped make this project easy to put together. You can see it all come together in the video that I have made for you.


It seems to be by nature lately in the creating world, for me to again play with 49 & Market rub-ons and elements. They were perfect for this sketch. Plus I added some cool rub-ons by Tim Holtz too.


The background was the good old smooshing technique using Mica powders by Finnabair.
My chipboard was painted with Dina Wakley acrylic in Cheddar.
A glorious orange hue.


I finished the whole page off with some green paint flick using Distress Oxide in Twisted Citron.

I would love you to check out the process video here.....


I love playing with colours I wouldn't usually play with. I hope this has inspired you to play along, you have another week to get your projects in 😉

Have a great week everyone.

Stay Crafty, Em xx


Sunday 8 May 2022

Relic - designed for 2Crafty Chipboard

Hello Everyone and welcome to my first share for the month of May.
This share is on the smaller scale of 8inx8in. I work mostly with 3x4 photo images, which work great on my usual 12x12 or A4 layouts. So this time I decided to create small and tight, but still using the 3x4 image. I love the result and also let's love how cool and quirky this image is too!


Now lets talk about the awesome chippy used.
I have chosen to play with some of the newer pieces which added an eclectic/steampunk vintage vibe to the project.

Pieces used are......

Mini Scissors
Mini Decorative frame set 6 
Corner Steampunk set 6


I wanted the chipboard to really sing around the image. I also wanted to use a new product and medium on the chipboard which was the new Ranger Foundry wax. And boy I was NOT disappointed! 


I could layer the colours over each other onto the chipboard as you can see here on the Steampunk corner, drying and setting the wax as I went. And the chipboard loved it! It certainly started to sing.


I was hoping it wouldn't hide any of the details of the chipboard as I painted the wax over the pieces, as sometimes if your painting with acrylic this can happen.  But as I was setting the wax the beautiful grooves and details really came through. As you can see on this pair of Mini Scissors, shining in Gilded Gold.


Each piece of chipboard has been treated with this finish on this page. And I must say that I am loving it! It really added to that steampunk vintage look I had desired from the start of the project.

I hope that my 8x8 page has inspired you to create this week and maybe play with a new or different medium on your chipboard. This chipboard LOVES all mediums!!

See you all soon, stay crafty.
Em xx


Friday 29 April 2022

Odis P. - Created for 2Crafty Chipboard

  Please meet Odis, he is the sweetest of them all.
Gentle and kind, Odis only wants what is best for all of earths creatures.


Check out the beautiful chippy I chose this week.....

Grid Panel
Polaroid Frames
Steampunk Element set1


So this page was inspired by another one of Lisa Aisato's art works off Pinterest. I loved that Odis looks so tranquil and yet boyishly dishevelled. His name came about by some Tim Holtz stickers I had in my stash. And so the page took form. I have a video for you today also, so you can see the story unfold.
Plus I love the chippy used in this piece, old and new pieces together.


Let's start talking about the finishes on the chipboard. They all were painted with an acrylic paint to start with, except the Polaroid Frame as this also had a little crackle paste on it before painting. I wanted to use muted tones to match the tones in the image. I blended some Distress Oxide inks over the Acrylic to add a chalky, old look to them.


The frame was painted in a darker blue to match the blue hues in the image. Distress Oxides were also blended over the top, especially where the paste was laid. 


Once the paint and the Oxides were added, I added a little dry brushing of Gold acrylic to all the chipboard pieces. This added a little bit of shine, but not impacting the more demure look I wanted on the pieces. I love how this Steampunk Element piece picks up all the light and dark shades.


While I stamped the background papers, I added a little stamping to the chipboard also. This gives just that extra bit of interest and helps tie them to the whole composition.

I would love it if you stopped by and checked out my video here....


Thank you for joining Odis and myself.

Stay crafty everyone.
Em xx


Thursday 21 April 2022

'Live Everyday with Intention' - Created for Scrappingclearly

Hello to you all this fine Thursday.
Today I am sharing a project that I made last year sometime and have yet to share it with you.
It was a fairly simple page, with techniques that we all like to play with. Plus I found the video of it being created too....bonus!!


It is an A4 layout created on heavy white cardstock. I started by using an image transfer by Dress my Craft and then a coat of clear gesso to seal that and the page together. I would love you to check out the video to see the process as it probably would explain the process much better than I could 😂😂😂


I used some great products on this page including the awesome Aall & create stamp Lotus Clusters, which I stamped onto the background with emboss ink and then using White emboss powder heat set it. I also stamped the same flowers onto white card this time with black ink and then added colour in a watercolour type technique.


The colours used where a combination of Izink pigment inks and Distress Crayons. I used the same colours on the background as well as on the stamped flowers. With the stamped flowers I incorporated a little pink too. The additional stamps on the back ground were from Tim Holtz Field Notes set and I used permanent ink to stamp these and add some more vibrancy to the page.
Beats using Black all the time.


I kept my embellishments simple, so the colours really made the statement. I did manage to use an awesome Finnabair Metal flower amongst the flower cluster. 
I hope you enjoy the process video and I will see you all again soon.


Stay crafty, Em xx


Thursday 14 April 2022

'Take the Scenic Route' designed for ScrappingClearly

 Hi there. 
Today I am sharing a very quick and easy Art Journal page with you that I also made a video of.
I based this page on this months mood/sketch colours. 


This page was created in my 5x7 Art by Marlene journal. I prepped my page with white gesso first as it had some marks and paint from a previous page.
Then I used Finnabair stencil Mind Games as an interest on the base with modeling paste.


Once the paste was dry, I started adding colour with Distress Crayons. I applied the colour like a watercolour over the background. making sure the colours met but didn't mix.
Once these were dry, I etched a black border and drew some loose lines amongst the pattern of the paste. This added a little more depth to the background. I also added a little light stamping using Framework Elements stamp by Aall & Create.


Popping that aside for a minute, I grabbed a couple of Naturalist Rub-ons by 49 and Market. I transferred one of the bright butterflies onto a piece of cardstock and then fussy cut it out. I also used some of the stitching lines amongst my drawn border. 


These colours work so nicely together. The quote used is from Tim Holtz Idea-ology quote chips and finally finished it all off with some black & white ink flick.

Please enjoy this page coming to life here....


Have a great week everyone and will see you again soon.
Em xx


Friday 8 April 2022

Theodore - Created for 2Crafty Chipboard

Meet 'Theodore'.
He is a 'good little boy, curious looking, with a gentle nature.
This project was made on Book plates and is only a little bigger than 5x7 inches. I love how it has become this slightly messy, vintage, worn project. A lot of care and thought went into this, as it does with all my projects, but more so to bring Theodore to life.


And  here is the stunning chipboard I used to make the story come alive.....

Window Shutter Set 1
Clock Face Discs
Steampunk Gears small
Geo Panel

I used all the small elements for this project which meant that I cut up the Geo panel to just tuck in and around the photos and it's layers.


For the gorgeous Window Shutter, I first cut the shutters off and used them off of the sides of the project. I then painted it with a brown acrylic paint first as a primer and then added some texture paste through a stencil to give it a weathered look. I added inks and sprays to it once dry. With a little wax and white paint at the end, it really gave a old worn look that I just love.


The smallest Clock Disc and the small Gears were kept raw to start with. With a little bit of wax, I enhanced them and then dry brushed ink and colour over the top, this made them unique.


I do really love the story telling that my art is allowing me to play with right now. This image is by an artist named Lisa Aisato who I found on Pinterest, she draws beautiful story book characters. I just love the feel of these characters, they totally inspire me.


I love how the chipboard adds to the story and the vintage vibe it gives. Maybe they are pieces that would not normally match but I do love how they all work on this project.


Thanks for joining me again today. I hope you have a creative day and I will see you all again soon.
Em xx